Timing Belt Change 200 Tdi Land Rover supplied by: Jason Crawford
If there was ever a job that was made out to be more than it should be, then this is it. Changing a timing belt on a Defender is pretty much straight forward. Mine had 164,000 on it when I changed it, I know it was done prior to that when it had 114,000 on it. When I removed the old belt it was in remarkably good condition. You’ll notice some yellow dots of paint on the pictures, they weren’t done by me, but I’ll explain them at the end of this page. Here’s how I changed the belt:
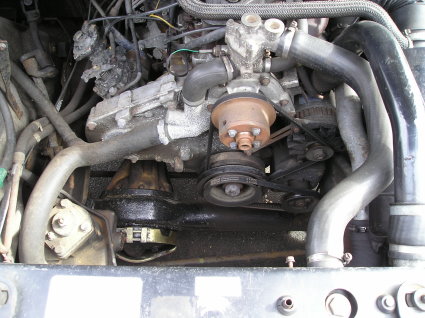
My Defender looks like this all the time anyway as I have no fan or fan cowl in there at all, but if you still run a fan remove it all so you can get to the pulleys.
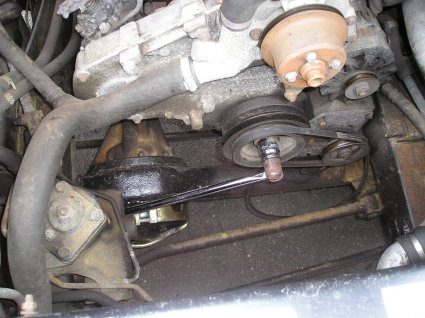
Loosen the alternator & power steering belts, put a 30mm socket on the long extension bar and the crankshaft damper (bottom pulley), make sure its touching the chassis, then click the ignition to turn the engine over Note: DON’T START IT THOUGH!. This will loosen you damper bolt.
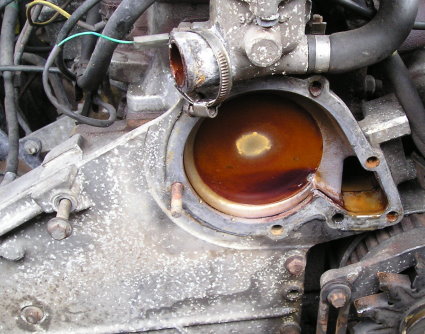
Once that’s done, remove the water pump, an move the two hoses too it out of the way.
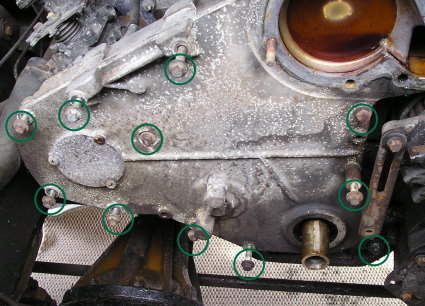
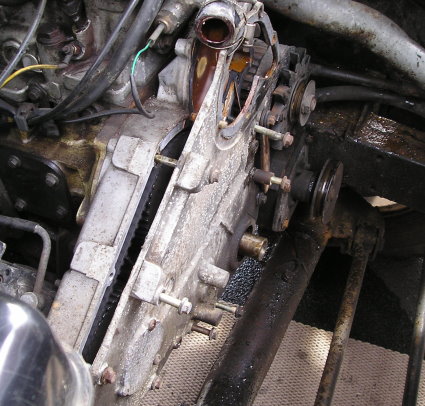
Then loosen the timing case cover , I do this leaving all the bolts in place as there are three different lengths so its easy to get confused putting them all back together.
Read more on changing the 200Tdi Land Rover timing belt on the next two pages of the website article. Click on next page to continue.
Its got a gasket on it, so it may take some prising off. Note that my crank damper
is removed. You may need to use a puller to remove this, but mine was loose after
I undid the bolt. It has a woodruff key that signifies the crank is at TDC.
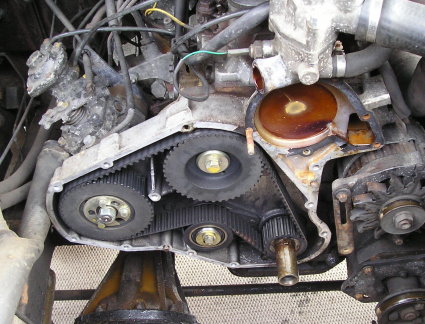
Here it is all removed, timing gear on show.
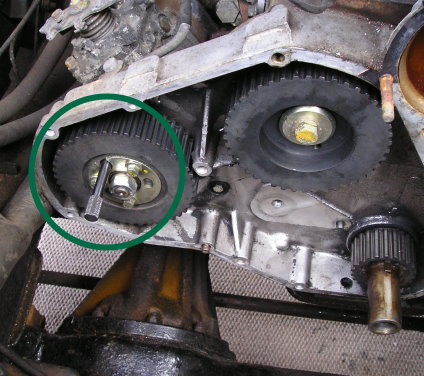
Now you must do set the timing. I had difficulty setting the injector pump
timing as some cowboy had been there before me and I couldn’t get the pin in
(above pic), so I cut the belt off and started to line it all up properly.
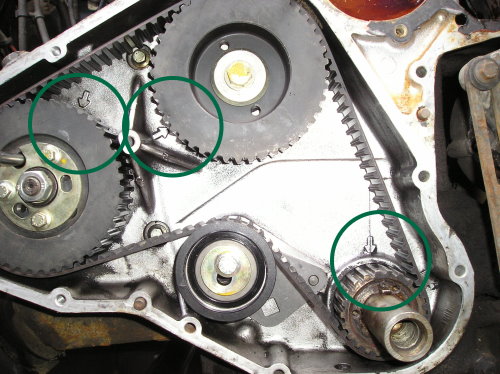
This is what we need to do. (above pic) Bottom right is the crankshaft, that
woodruff key (little square notch on top of crank) sits at 12 o’clock in line
with the arrow above it. Lock this in place by putting a locking pin in the
flywheel housing drain plug (next picture below). The top one is the camshaft,
you can just see a small dot on the face of the pulley, that lines up with the
arrow opposite it. The one to the left is the injection pump. I loosen the
three bolts on the front that hold the plate on, then put the locating pin to
lock the pump in place, I tighten the bolts back up when the belt is on in the
right place the pin fits in at the 11 o’clock position. If its at 5 o’clock your
180degrees out so turn the motor around (with belt on, rotate crank pulley
so it all moves around in time). The wheel in the bottom middle is the tensioner.
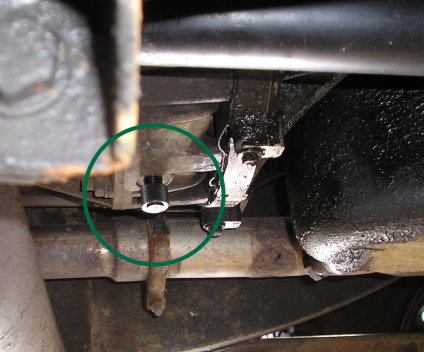
If I look under the drivers door of my 110 towards the gear box then this is
what I see, the shiny bit is the locking pin I have just put in place. If you actually
look through the hole before you put it in you will easily see the groove it fits in.
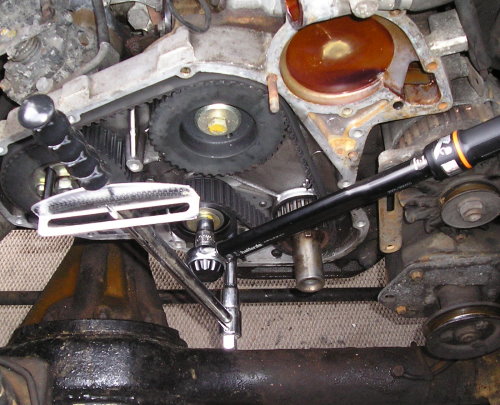
Using the two torque wrenches you set the tension of the new belt, make
sure the injection pump 3 bolts are tight now, then remove the locking pins
(flywheel on as well!) then turn the engine over by hand (use crank damper)
and make sure nothing catches (if timing is way out, then you will notice
straight away that the engine won’t rotate, it’ll lock as valves/pistons touch. )
I should have put this in earlier, but I didn’t refer to it much in use.
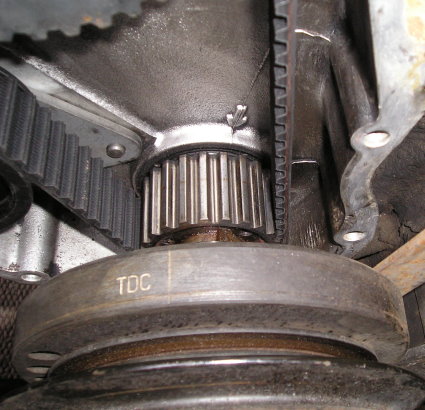
This is obviously the crank damper, at TDC you note that the TDC marks
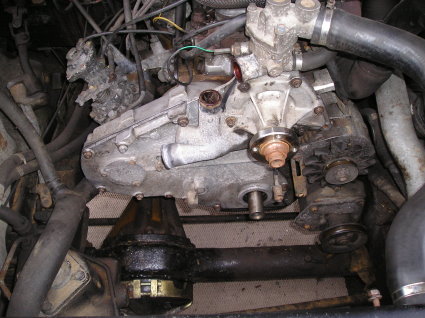
are actually at about 11 o’clock. If you look at the 4th picture on this page
you see that a raised seam/line on the timing gear cover plate can be seen
running from the crank shaft hole to the horizontal line running across the
cover plate. That line at 11 o’clock is what this TDC line will line up with…..
just so you know!
re-assemble with relevant gaskets (or just silicone gasket if your that way inclined), refill with water/antifreeze, then your done!, start it, if it goes bang it wasn’t right! (don’t worry! it won’t go bang!!! if you did the timing right and tightened every thing up.) By the way, make sure that someone stands on the brake (put it in gear) when you tighten up the crank damper bolt bloody tight!
Any problems? Errr, yes, just the usual.
The yellow dots of paint I mentioned. The belt was previously changed at 114,000 mile in February 2001, then in August 2001 the owner got someone to fit a new fuel pump. The guy who fitted it obviously couldn’t be arsed to re-set the timing correctly so he put yellow dots of paint on the timing gear then re-assembled following the dots. Trouble was he was a bit out! So I noticed a substantial improvement in the running of my landy after I had changed the belt and reset the timing correctly myself. It now smokes much less (hardly any in fact) and is definitely smoother. This should also be good news for fuel economy considering I was already getting 30mpg with the timing slightly out! The other problem was pattern parts…. again. Look at the pic below.
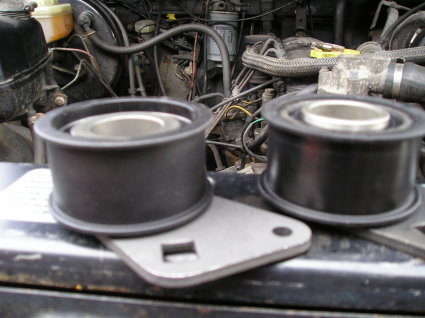
That’s the land rover original one on the right with the raises inner sleeve, and the “blue box” one on the left which clearly has a thinner inner sleeve. What this essentially means is that I needed to cut the securing bolt 8mm shorter to get it to tighten correctly. The gasket for the timing case cover was totally the wrong shape (yet correct code!) also. Its well worth getting the timing case cover water tight, you don’t want mud in there with the belt keeping everything in line!
If you do this then work from the Haynes manual, I think my pictures are clearer, but they definitely more in depth than my explanation.
Special thanks to Jason Crawford for this excellent article.
Jason Crawford does have a very nice and comprehensive website
featuring several Land Rover maintenance jobs!
Check these links for more info:
http://www.jojas.co.uk/timing_belt_change.htm
http://www.jojas.co.uk/indexlandy.htm


